 So I was out for a quick jog with my baby when I saw a TV stand/console table on the curb just 2 blocks from my house. At the time I was not much of a dumpster diver. This piece ignited my fire! I immediately thought that I could upcycle this piece into a buffet table.
I made my husband do the dirty work and take the truck to go grab it. I rushed him like it was a free $500 bill on the curb. We brought it inside and I took the doors off and within a day had painted it with a chalk paint I had bought without intentions. This color – called “vintage” covered better than Americana Decor’s white (called “everlasting”). I love chalk paint because there is no prep work once you clean off the dust and since you’re going for a distressed or rustic type of feel you can be sloppy. I painted this at nap time and after my kids went to bed and finished the project easily within one weekend. If you look closely you can see that I was working under poor lighting conditions but to me that adds character to the piece. I’ll always remember painting it when my son was only weeks old.
I envisioned this more like a buffet table so I spent $20 to add wood legs to the bottom. I 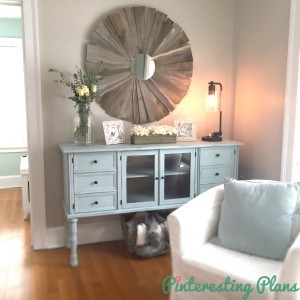 lightly distressed the piece with sandpaper and then waxed it. I also painted the hardware black.
A week later I was flipping through a Ballard‘s catalogue and saw a similar piece to the one I originally found for $799. My neighbor’s trash – my treasure 🙂 
Be sure to check out our other DIY Projects before you go!

zao
September 4, 2016 at 11:45 pmThis is so beautiful! How did you attach the legs to the console?
rachelmacgillis@gmail.com
September 4, 2016 at 11:47 pmoh thank you 🙂
we just drilled a small hole in the bottom of the “feet” of the piece and then poured wood glue into the holes and screwed in the new legs.
Traci
November 28, 2016 at 12:35 amHow did you secure the legs?
rachelmacgillis@gmail.com
November 28, 2016 at 2:59 amdrilled a hole in the 4 foot pieces of the cabinet and then put wood glue in them and just twisted the screw from the table legs we bought into that hole. hope that helps 🙂
Lili
January 26, 2017 at 1:40 pmWhat a great eye! That is so funny you found a piece later almost identical!
rachelmacgillis@gmail.com
January 27, 2017 at 2:41 pmthank you so much!!!
Brenda Zimmerman
February 4, 2017 at 1:25 amWhere did you find the legs that you added?
rachelmacgillis@gmail.com
February 4, 2017 at 2:43 amHome Depot! I think they’re linked? if not and you want the exact ones I could email you the link to them. thanks :). they were around $5 each
DIY Large Wood Sunburst Mirror - Pinteresting Plans
April 16, 2017 at 6:51 pm[…] wanted a piece to put above the side table I have in my living room. My style is generally rustic and involves wood and I was looking for a […]